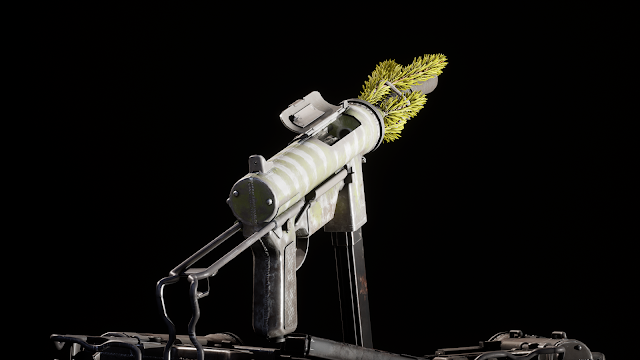
This project I will be creating a branch of the Korean Golden Fir tree or
Abies koreana ‘Aurea’. This branch will be used to create some vegetative camouflage for my grease gun project. The Korean Golden Fir tree is a native fir tree to the Korean peninsula it is the perfect tree to be used with the Korean war era weapon I'm trying to design. It becomes a rich yellow green during spring. I'm trying to make a skin for my weapon the corresponds to my tank project. The tanks paintjob is a tiger which was used during Operation Ripper in early snowy spring of 1951. I will be using xgen to basically share an introduction to the tool.
First To start an XGen project you need to have a base mesh to grow from. Somewhat unintuitively the "New Description Name:" is not header of the collection. This is where I made a naming mistake in naming. This step is not easily fixable after creating the project. Changing xgen names can destroy your project.
For what I'm creating I want to use splines so they are very controllable. Next I will select in uniform rows, I change this later to at specified points. Then I select placing and shaping guides. These settings allow me to control the generated mesh.
Here you can see the vertices that are linked to the Xgen project.
Here is an overview of the options menu for Xgen. This menu allows you to manipulate the type of primitives and then later planar geo that Xgen will create. The two most useful submenus I've found are the "Primitives" menu and the "Modifiers" menu. For what we are doing in this project the modifiers menus isn't necessary, but it is very useful when creating hair or larger amounts of foliage. In the modifiers menu you can add noise and various other modifiers to create curly hair, fly aways, clumped hair, and various other naturalistic looking effects. The primitives menu will allow you to edit the type of primitives produced. This menu is the main menu we will be using. Starting at the top "generate primitives" is the type of distribution that the primitives will utilize to generate. Next the "Spacing" will change the spacing. Then for "primitive type" I use splines; you can also use cards if you want to set up hair cards; or spheres if you want to make bubbles? Then below that is the control method. Under "Control using" I chose guides for their precision. underneath this is the CV count. This specifies how many control points that your guides have so that you can sculpt them into shape. we will explore the rest later.
^
Next you want to use the place guides tool to place your guides.
Before you start sculpting its good practice to make the mesh you are using as your base is made a live surface. This will ensure that as you are selecting your guides you don't accidentally select the mesh.
Now you can select all the guides you would like to sculpt. You need to have the guides selected to be able to sculpt them.
^ X
The sculpt guides tool is selected by the green arrow above. make sure when working with large amounts of primitives you don't select the convert to mesh button. It is poorly placed right next to the sculpt guides tool.
Now I sculpt the guides upward to create the shape of the fir needles.
You can also place and move guides with the place guides tool. To move a guide hold down Ctrl + click and drag the guide to your desired position. One really cool thing about Xgen is that when placing new guides around already sculpted guides it will interpolate the shape of the surrounding guides to conform it to the other guides.
Now you can visualize the primitives that you want create by selecting the open eye tool.
V
Now you can use the width ramp to create the shape you are looking for in your fir needles. You can change the type of flow on the ramp by changing the "interpolation" from linear to smooth.
Next I want my needles to be a bit larger so I simply select the guides and use the scalar tool to grow them. Because they are splines they will only grow as a curve. This will not effect your primitive thickness. To manipulate thickness use the width slider.
Next will will finally use that pesky convert to mesh tool. It will create planes that correspond to the primitives generated. The mesh generation is camera based so to ensure that my mesh generates properly I place the camera at the top view of the object.
Next I take the meshes generated and extrude them to create my base for the needles. A couple times I didn't like the scale and shape of my needles, but as a non destructive process, I was able to use Xgen over and over again to tweak and generate new meshes. This is definitely a strength of this methos of making fir foliage.
I use smooth mesh preview to create the high poly needles that I will be baking onto my cards.
Next I created some low ply planes to bake the fir needles to.
I then go on into marmoset and created textures and alpha maps to create a branch of the Korean Golden Fir Tree. These trees are a rich gold in the winter and turn a light yellowy green in the spring and summer.
V Reference V
I then took these branches and applied them to my Grease gun to create a camouflaged look


No comments:
Post a Comment